

Prepare 12 equal pieces of straw for this first element. You will thread an octahedron: two pyramids sharing a square base. This is one small model that can later become part of a larger hanging composition.
Craft practitioner Loreta Lichtarovičienė’s teaching material also identifies a small 12-piece form. Below is an independently prepared geometry diagram and one explicit threading route. Read our introduction to sodai for cultural context, and explore the sodai.eu teaching-film collection for makers’ demonstrations and other methods.
Materials and preparation
- 12 sound, hollow pieces of cereal straw, plus spares.
- Thin, strong thread that can pass through your chosen straw more than once.
- A needle that fits freely inside the straw, scissors and a ruler.
Choose straight sections without closed nodes. Remove leaf sheaths, check that each tube is open and set cracked pieces aside. For this exercise, you could cut 5 cm lengths. This is an example measurement for our model, rather than a fixed traditional rule. All 12 pieces need to be the same length.
Test a single piece before cutting the whole set. If it shatters, try dampening it and using scissors that crush it less; do not leave the finished structure wet. Preparation time depends on the material, so there is no universal soaking time here. Also test the fit of needle and thread. Children need adult help with needles and scissors.
The diagram: square, upper pyramid, lower pyramid
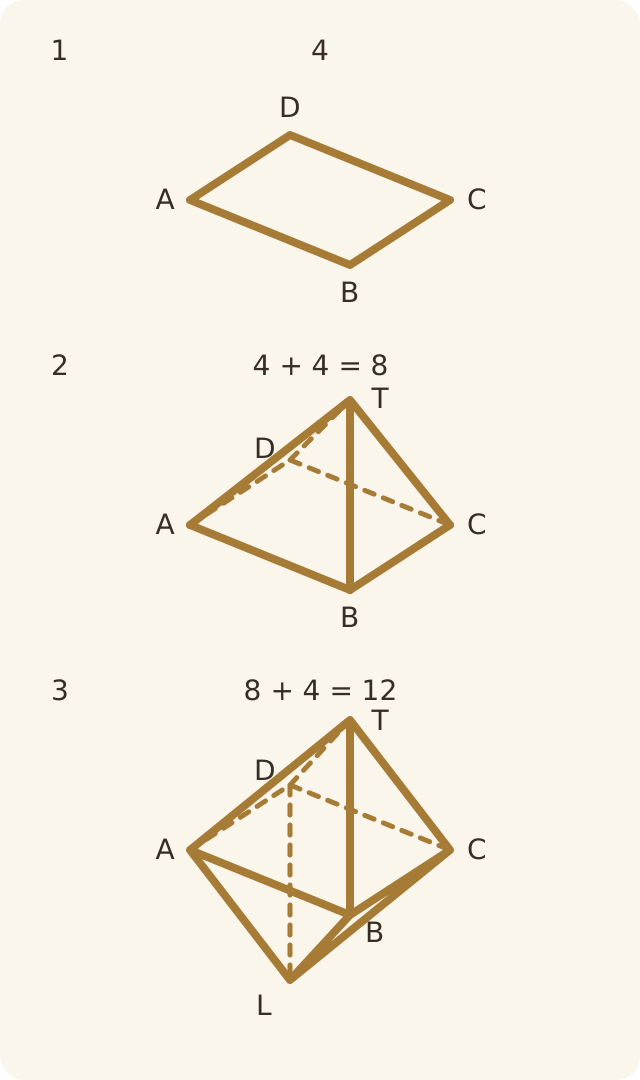
The count is 4 for the square + 4 above + 4 below = 12. Sometimes the thread travels through an existing edge to reach the next corner. This does not add another straw.
Thread the element step by step
- Make square ABCD. Thread 4 pieces onto approximately 2 m of thread. Leave a tail for tying and knot the thread at A to close the loop. Leave room for the joints to move, without long exposed gaps. Lay the square down and identify its corners in order: A–B–C–D.
- Start the upper pyramid. From A, thread 2 new pieces and tie the working thread to the square’s thread joint at B. The meeting point between the new pieces will be T. Lift it above the square.
- Connect corner C. Pass the needle through the existing B–C straw. From C, add 1 new straw and secure the thread at T, to the exposed thread joint between the two pieces added in the previous step.
- Complete the upper pyramid. From T, add 1 new straw and tie at D. T is now connected to all four square corners. You have used 8 pieces.
- Start the lower pyramid. From D, add 2 new pieces and tie at A. Place their meeting point L on the opposite side of the square from T. You can turn the structure over to work more comfortably.
- Connect B and C to L. Pass through the existing A–B straw to reach B. Add 1 new piece B–L and tie to the exposed thread joint at L. Add the final piece L–C and secure at C. Count the edges: there should be 12.
- Check and hang. Gently redistribute slack and secure the knots. Attach a separate hanging loop to the thread joint at T, without crushing the straw itself. Trim spare ends only once you know the knots hold.
Common problems and what to check
- The shape leans: compare straw lengths and look for a longer exposed thread loop at one joint.
- An end splits: reduce tension. A knot should connect the edges without cutting into the straw. Replace damaged pieces.
- One pyramid folds inside the other: T and L need to sit on opposite sides of their shared square. Gently open the structure out.
- The needle sticks: do not force it. Check for a closed node and confirm that the needle and repeated thread passes fit inside the tube.
Before adding more elements, lift the model by its loop and inspect it from several angles. Repeating the same form is a useful next exercise: differences in cutting and tension become easier to see. You can explore these connections in person at the Labas Noras straw garden workshop.